HotDoodle Logo
User Accounts

Users are the electronic identities associated with people who log in and use your HotDoodle website. You can create user accounts or configure your HotDoodle website to create individual user accounts by adding the Login Block.

Reasons a visitor would register on your HotDoodle Website:

  • Ability to view a page that is not available to the public
  • Ability to make a purchase on the website
  • Ability to download a resource that is only available to members
  • Ability to view or to post to a discussion board
  • Ability to upload pictures
  • Ability to add events to a calendar
  • Ability to edit a block, a page, or even the entire website
  • Ability to own their own profile and member pages on your website

As the website owner, control the abilities that users have by assigning permissions. To simplify the task of assigning permissions individually to each user, HotDoodle allows you to organize individual users into groups and assign an entire group the same permission. Individual users can have unique permissions as well as permissions assigned by the group they are in. Some groups are controlled by the website administrators, some groups allow individuals to join groups at any time, and others have join requests approved or denied by the website administrator or group admin. Group Accounts

Create a New User Account

Edit an Existing User Account

Import Users

Export Users

Ban Users

Create a Group Account

Add a User to a Group


Create New User Accounts

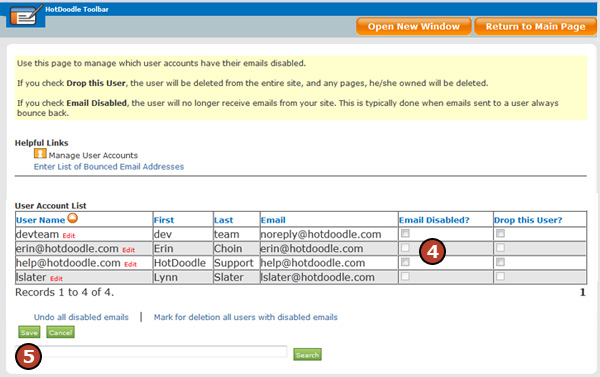
You might want to create users that will log in to your website and help you edit it.

Steps: How to Create a New User Account

1. From the HotDoodle Toolbar, click on the "Administration" tab.

2. Click on the "User & Group Accounts" button.

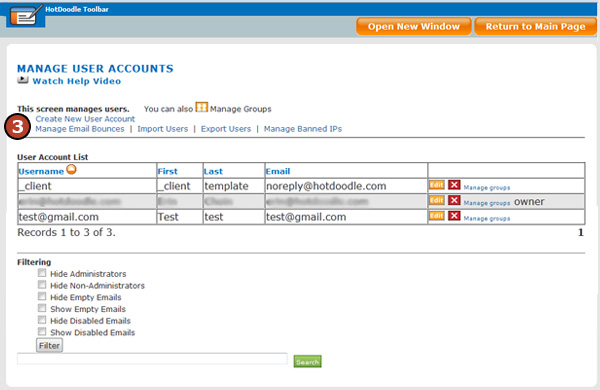
3. Click on the “Create New User Account” link.

4. Type in the First and Last Name of the user.

5. Type in the Email Address of the user.

6. Type in a Password for the user. (Optional)

7. To make a user an administrator, click on the first checkbox (this option is mainly for people within your organization that will have full permission to edit the website). Never create a new user with the Banned User checkbox checked. Click here to find out why

8. Use the drop-down menu options to determine whether or not other users see the user’s email address and the format for the user’s emails.

9. Click on the "Advanced Fields" button.

10. Select options from the drop-down menu to direct email from Group Communications and Subscriptions.

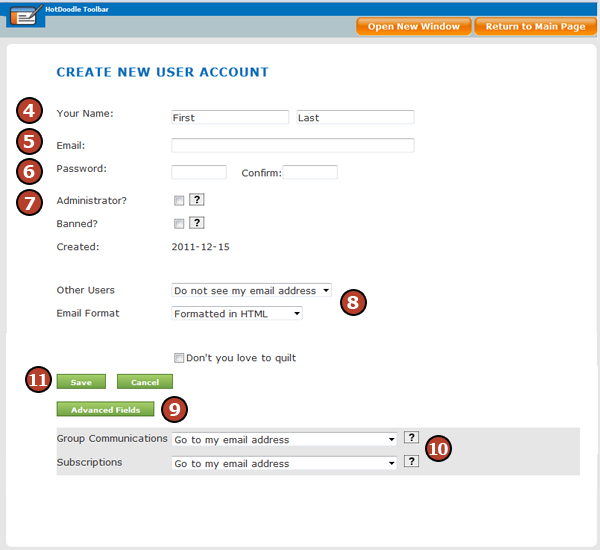
11. Click on the "Save" button.


Subscribe to Emails

Users may ask to "subscribe" to part of the website which means that they are informed when that part of the website changes. This notification is in the form of a message that is sent to their email address or to an on website "inbox" that holds the messages, or to both.

It is possible for users to subscribe to many website areas. An efficient option to create a group, a collection of users. Once a group is created, the group admin can subscribe group members to appropriate areas of the website.

HotDoodle allows multiple discussions on a Bulletin Board of a website. Community-oriented websites might have a Bulletin Board with multiple areas, each dedicated to a specific topic. The website administrator or group admin can control notifications sent from the Bulletin Board and individual users can choose if they would like to receive the notifications.

Note: To manage messaging or recipients, click on the "Manage User Accounts" or "Manage Group Accounts" links, which are found under the "Administration" tab -> "User & Group Accounts" buttons on the HotDoodle Toolbar.


Communication Options

When you register or visit your account profile, you have the following email options:

  • Other users - Options set if the user's email address will be shown to other users allowed to message the user. If you show your email address, you make it easier for people to contact you outside of HotDoodle, but you also make it easier for the address to get picked up and used by spammers.
  • Email Format - Options set if email will be formatted in HTML or formatted plain text. HotDoodle allows formatted text almost everywhere. Formatted messages may look odd or lose content if converted to plain text. HotDoodle will convert to plain text if specified.

In the Advanced Fields:

  • Group Communications - This gives the option of how to direct email coming from members of a group you are a part of when members are eligible to email anyone in that group. In addition, messaging can be configured to go to your email address or to the site inbox. Website Inbox
  • Subscriptions - This gives the options to decide if you get subscription change notices (email notifications) and if these go to your email address or to the site inbox.

The options include:

  • Get Discarded - user will not receive any emails. 
  • Go to my site inbox - emails will be sent to the inbox set up on the HotDoodle website. Website Inbox
  • Go to my email address - emails will be sent to the user's registered email address.
  • Go to my email address and my site inbox - emails will be sent to the inbox set up on the HotDoodle website and to the user's registered email address.

Manage Email Bounces

There may be users on the website that often have emails returned or bounce back as undeliverable email. Configure the HotDoodle website not to send emails to those users to avoid receiving emails bouncing back undelivered.

Steps: How to Turn off Email to User Accounts

1. From the HotDoodle Toolbar, click on the "Administration" tab.

2. Click on the "User & Group Accounts" button.

3. Click on the “Manage Email Bounces” link.

4. Click on the checkbox next to all of the users to stop sending email to under the [Email Disabled?] section.

You can also undo any disabled emails from this screen as well if a user updates their email address or fixes the problem that caused the emails to bounce back previously.

5. Click on the "Save" button.


Edit Existing User Accounts

Steps: How to Edit an Existing User Account

1. From the HotDoodle Toolbar, click on the "Administration" tab.

2. Click on the "User & Group Accounts" button.

3. Click on the "Edit" button to the right of the user you want to edit.

4. Edit the First and Last Name of the user.

5. Edit the Email Address of the user

6. Edit the Password of the user. (Optional)

7. To make the use an administrator, click on the first checkbox (this option allows the user to have full editing capabilities on the website and is mainly intended for people within your organization that will have full permission to edit the website). You can ban a user with the Banned User checkbox clicked. More on Banned Users

8. Edit the drop-down menu options to determine whether or not other users see the user’s email address and the format for the user’s emails.

Other editing options include: Unlocking a User, Clearing a Password, Assigning Users to Groups, and Deleting a User. More on Groups

9. Click on the "Save" button.


© 2006 - 2015 Metabyte, Inc., All Rights Reserved, Patents Pending

http://www.hotdoodle.com, HotDoodle™ Custom Web Design and Quality Affordable Website Designers for Small Businesses and Professionals
Powered by http://www.hotdoodle.com, HotDoodle™ Custom Web Design and Quality Affordable Website Designers for Small Businesses and Professionals
Affordable Quality Website Designers, You Edit Site Map